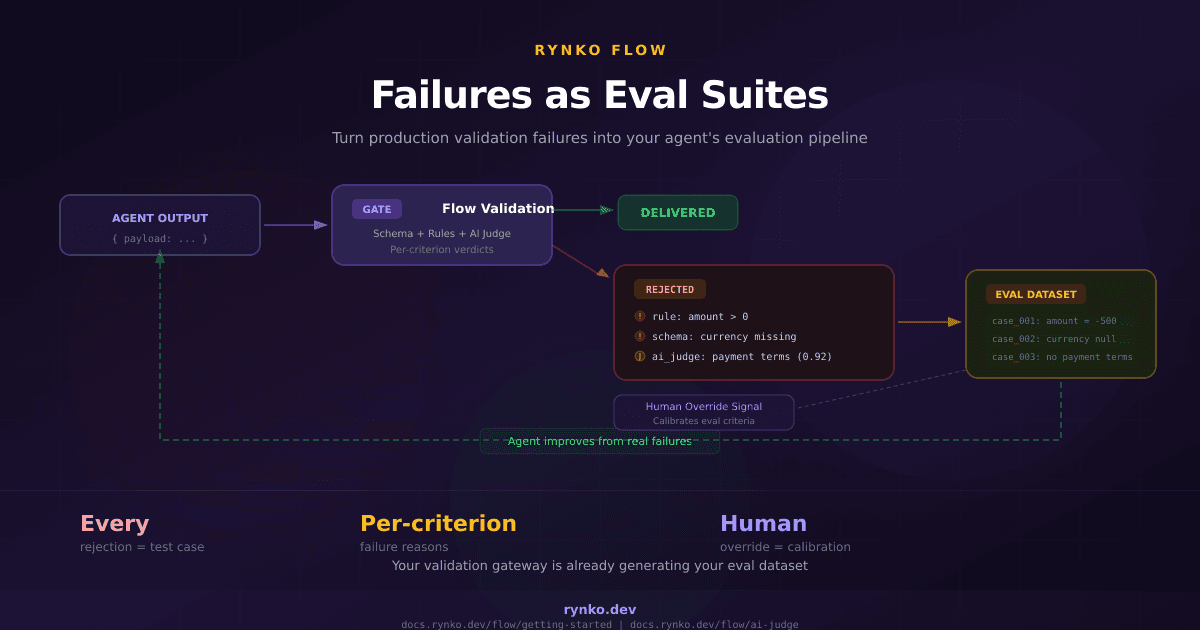
How to Generate Documents from Cursor IDE with MCP
Generate PDFs and Excel files without leaving your editor. Build document generation into your app while Cursor handles the templates.
If you're building an app that needs to generate documents — invoices, reports, contracts — you probably have a dedicated document service or a messy Puppeteer setup. What if you could design templates, test generation, and integrate the API all from within Cursor?
With Rynko's MCP server, Cursor can create document templates, generate PDFs and Excel files, and help you write the integration code — all in a single workflow.
Why This Matters for Developers
When you're building a feature that generates PDFs, the workflow usually looks like:
Open the document service dashboard in a browser tab
Design a template there
Switch back to your editor
Write the API integration code
Test, realize the template needs changes
Switch back to the browser, tweak the template
Repeat
With MCP, Cursor becomes your document generation command center. Template creation, testing, and code generation happen in the same place you're writing your application code.
Setup (2 Minutes)
Prerequisites
Cursor installed
A free Rynko account
A Personal Access Token (create one at Settings > Personal Access Tokens in the dashboard)
Configure MCP
The easiest way is through Cursor's settings UI:
Open Cursor Settings (Cmd+, / Ctrl+,)
Go to Features > MCP
Click Add New MCP Server
Enter a name (e.g., "rynko") and select command as the type
Enter the command:
npx -y @rynko/mcp-serverAdd the environment variable:
RYNKO_USER_TOKEN=pat_your_token_hereClick Save
Alternatively, you can add it directly to .cursor/mcp.json in your project root (or ~/.cursor/mcp.json for global access):
{
  "mcpServers": {
    "rynko": {
      "command": "npx",
      "args": ["-y", "@rynko/mcp-server"],
      "env": {
        "RYNKO_USER_TOKEN": "pat_your_token_here"
      }
    }
  }
}
Restart Cursor. The Rynko tools will appear in Cursor's MCP tool list.
Verify It Works
Open Cursor's AI chat (Cmd+L / Ctrl+L) and type:
List my Rynko workspaces and templates
If you see your workspace and any existing templates, you're ready.
Workflow 1: Build a Document Feature from Scratch
Let's say you're building a SaaS app and need to add invoice generation. Here's the full workflow in Cursor:
Step 1: Create the Template
Create a Rynko PDF template called "customer-invoice" with:
- Company logo and name in the header
- Invoice number, date, and due date
- Customer name, email, and address
- Line items table: description, quantity, unit price, amount
- Subtotal, discount (optional), tax, total
- Payment instructions footer
- Professional styling with a blue accent color
Cursor creates the template via MCP. It's saved as a draft in your Rynko workspace.
Pro Tip: Have a company logo? Drop the image file into your project directory and tell Cursor: "Upload src/assets/logo.png as my company logo." Cursor will save it to your Rynko asset library and link it in the template.
Step 2: Test with Sample Data
Preview the customer-invoice template with:
- Invoice #INV-2026-100
- Customer: Acme Corp, john@acme.com
- Items: 3x "Monthly Subscription" at $99, 1x "Setup Fee" at $250
- 10% discount, 8% tax
Cursor generates a preview (free and watermarked) and gives you the download link. Check the PDF — if it needs tweaks, just describe what to change.
Step 3: Generate the Integration Code
Now here's where it gets powerful. Ask Cursor to write the code:
Write a TypeScript service that generates invoices using the
customer-invoice template via the Rynko SDK. Include:
- A generateInvoice function that accepts order data
- Webhook handler for document.generated events
- Error handling and retry logic
- Types for the invoice variables
Cursor writes the code knowing exactly what variables the template expects, because it just created the template. No guessing, no mismatched field names.
// Generated by Cursor with knowledge of the actual template schema
import { Rynko } from '@rynko/sdk';

interface InvoiceItem {
  description: string;
  quantity: number;
  unitPrice: number;
  amount: number;
}

interface InvoiceData {
  invoiceNumber: string;
  date: string;
  dueDate: string;
  customerName: string;
  customerEmail: string;
  customerAddress: string;
  items: InvoiceItem[];
  subtotal: number;
  discount?: number;
  tax: number;
  total: number;
}

const rynko = new Rynko({ apiKey: process.env.RYNKO_API_KEY! });

export async function generateInvoice(data: InvoiceData): Promise<string> {
  const job = await rynko.documents.generatePdf({
    templateId: 'customer-invoice',
    variables: data,
  });

  const completed = await rynko.documents.waitForCompletion(job.jobId);

  if (completed.status !== 'completed') {
    throw new Error(`Invoice generation failed: ${completed.errorMessage}`);
  }

  return completed.downloadUrl;
}
Step 4: Iterate
Need to change the template? Just ask in the same conversation:
Update the customer-invoice template to add a QR code
in the bottom right with the payment URL
Cursor updates the template and you can immediately test it again — without leaving the editor.
Workflow 2: Recreate Any Document from a Sample
Have an existing PDF, screenshot, or mockup? Cursor can recreate it as a Rynko template.
Drop the sample file into your project directory and ask:
Look at docs/sample-invoice.pdf. Create a Rynko template that
matches this layout. Identify all the dynamic fields and create
variables for them.
Cursor reads the file, analyzes the layout — header position, table structure, column widths, alignment, colors — and creates a matching template via MCP. It figures out which parts are static (labels, logos) and which are dynamic (names, amounts, dates).
Works great for:
Migrating from Word/mail merge templates
Recreating documents you only have as PDFs (no source file)
Converting a designer's mockup into a working template
Matching a client's existing document format
Workflow 3: Migrate HTML Templates to Rynko
Already have HTML templates or Puppeteer-based generation? Cursor can migrate both the template and the code:
I have this HTML invoice template in src/templates/invoice.html.
Create an equivalent Rynko template that matches the layout,
then write the migration code to replace the Puppeteer generation
with Rynko SDK calls.
Cursor reads your existing HTML, creates a matching Rynko template, and rewrites your generation code. You go from a 3-8 second Puppeteer pipeline to sub-500ms native rendering.
Workflow 4: Data-Driven Reports
Combine Cursor's code understanding with document generation:
Look at the analytics data shape in src/services/analytics.ts.
Create a Rynko report template that visualizes this data with:
- A summary section with key metrics
- A bar chart of monthly revenue
- A table of top customers
- Page break, then a detailed transaction log

Then write a scheduled job that generates this report weekly.
Cursor understands your data types, creates a matching template, and writes the automation code — all in one conversation.
Tips for Cursor + Rynko
Share config across the team — If using the
.cursor/mcp.jsonfile approach, commit it to your repo so every team member gets the same MCP setup (just use different tokens)Let Cursor inspect templates — Before writing integration code, ask Cursor to get the template details. It'll write more accurate code when it knows the exact schema
Preview before publishing — Templates created via MCP are drafts. Preview them with sample data, iterate, then publish from the dashboard when ready
Keep templates in sync — If you update a template in the visual designer, ask Cursor to re-inspect it so it knows about the changes
Combine with your codebase — Cursor can read your existing types and models, then create templates that match your data shape perfectly
Available MCP Tools
Here's what Cursor can do via the Rynko MCP server:
| Tool | Description |
list_workspaces | List your workspaces |
switch_workspace | Switch workspace context |
list_templates | List all templates |
get_template | Get template details and variables |
create_draft_template | Create a new template |
update_draft_template | Update a draft template |
validate_schema | Validate template JSON |
get_schema_reference | Get template schema docs |
preview_template | Generate a free preview (watermarked) |
generate_document | Generate a production document (Cursor will confirm credit usage first) |
get_job_status | Check generation status |
parse_data_file | Parse Excel/CSV to JSON |
map_variables | Auto-map data to template variables |
list_assets | List image assets |
upload_asset | Upload images for templates |
Get Started
Sign up free — 5,000 credits included
Add the config to
.cursor/mcp.jsonStart a chat: "Create a Rynko template for..."
The best part: Cursor already understands your codebase. Combined with Rynko's MCP tools, it can build end-to-end document generation features that perfectly match your data models.
Get Started Free | MCP Documentation | SDK Reference
Our MCP server also works with Claude Desktop (one-click install via .mcpb extension), VS Code, Windsurf, and Zed. See the full setup guide.
Disclosure: I ideate and draft content, then refine it with the aid of artificial intelligence tools like Claude and revise it to reflect my intended message.