Getting Started with Rynko in 5 Minutes
Sign up, create a template, and generate your first PDF — all in under 5 minutes.
This guide walks you through generating your first document with Rynko. By the end, you'll have a working PDF generated from a template via our API.
Step 1: Create Your Account (30 seconds)
Head to app.rynko.dev/signup and create a free account. No credit card required.
Every new account comes with 5,000 free document credits as part of our Founder's Preview — more than enough to build and test.

Step 2: Create a Template (2 minutes)
Once you're in the dashboard, click New Template to open the visual designer.
You have three options:
Option A: Use a Pre-Built Template
Browse the template gallery and pick one that's close to what you need — invoices, reports, certificates, and more. Customize it in the designer.
Option B: Design from Scratch
The drag-and-drop designer supports 28 component types. Drag in text, tables, images, charts, QR codes, and more. Set up variables using {{variableName}} syntax in any text field.
Option C: Let AI Create It (MCP)
If you're using Claude Desktop or Cursor with our MCP server, just describe what you need:
"Create an invoice template with company logo, customer details,
a line items table, and totals with tax calculation"
For this guide, let's create a simple invoice. Add these variables to your template:
| Variable | Type | Description |
invoiceNumber | string | Invoice identifier (e.g., "INV-2026-001") |
clientName | string | Customer name |
clientEmail | string | Customer email |
lineItems | array | Line items with description, quantity, price |
subtotal | number | Subtotal amount |
tax | number | Tax amount |
total | number | Total amount |
Click Publish when you're happy with the design.
Tip: Use the Preview button to test your template before publishing. Previews are free and don't consume credits.

Step 3: Get Your API Key (30 seconds)
Go to Settings > API Keys and create a new key. Copy it — you'll need it in the next step.
Your API key starts with your team ID and gives programmatic access to your templates and document generation.
Step 4: Generate a Document (2 minutes)
Pick your language:
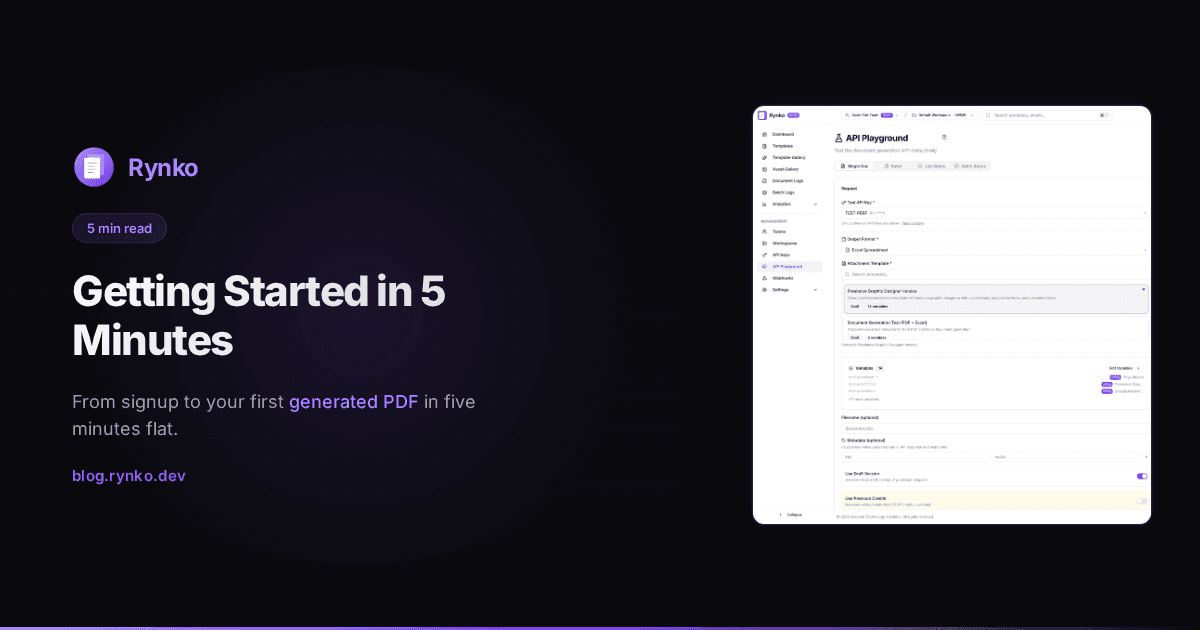
You can also test document generation without code using the API Playground in your dashboard — paste in variables and generate a document directly from the browser.
Node.js
npm install @rynko/sdk
import { Rynko } from '@rynko/sdk';

const rynko = new Rynko({
  apiKey: process.env.RYNKO_API_KEY!,
});

// Generate a PDF
const job = await rynko.documents.generatePdf({
  templateId: 'invoice', // Your template slug, shortId, or UUID
  variables: {
    invoiceNumber: 'INV-2026-001',
    clientName: 'Acme Technologies Pvt. Ltd.',
    clientEmail: 'accounts@acmetech.com',
    lineItems: [
      { description: 'Technical Consulting', quantity: 2, price: 150.00 },
      { description: 'Software License', quantity: 1, price: 500.00 },
    ],
    subtotal: 800.00,
    tax: 80.00,
    total: 880.00,
  },
});

console.log('Job queued:', job.jobId);

// Wait for completion
const completed = await rynko.documents.waitForCompletion(job.jobId);
console.log('Download URL:', completed.downloadUrl);
Python
pip install rynko
import os
from rynko import Rynko

client = Rynko(api_key=os.environ["RYNKO_API_KEY"])

# Generate a PDF
job = client.documents.generate_pdf(
    template_id="invoice",
    variables={
        "invoiceNumber": "INV-2026-001",
        "clientName": "Acme Technologies Pvt. Ltd.",
        "clientEmail": "accounts@acmetech.com",
        "lineItems": [
            {"description": "Technical Consulting", "quantity": 2, "price": 150.00},
            {"description": "Software License", "quantity": 1, "price": 500.00},
        ],
        "subtotal": 800.00,
        "tax": 80.00,
        "total": 880.00,
    },
)

print(f"Job queued: {job['jobId']}")

# Wait for completion
completed = client.documents.wait_for_completion(job["jobId"])
print(f"Download URL: {completed['downloadUrl']}")
cURL
# Generate a document
curl -X POST https://api.rynko.dev/api/v1/documents/generate \
  -H "Authorization: Bearer YOUR_API_KEY" \
  -H "Content-Type: application/json" \
  -d '{
    "templateId": "invoice",
    "format": "pdf",
    "variables": {
      "invoiceNumber": "INV-2026-001",
      "clientName": "Acme Technologies Pvt. Ltd.",
      "clientEmail": "accounts@acmetech.com",
      "lineItems": [
        {"description": "Technical Consulting", "quantity": 2, "price": 150.00},
        {"description": "Software License", "quantity": 1, "price": 500.00}
      ],
      "subtotal": 800.00,
      "tax": 80.00,
      "total": 880.00
    }
  }'

# Response includes a jobId - poll for completion
curl https://api.rynko.dev/api/v1/documents/jobs/JOB_ID \
  -H "Authorization: Bearer YOUR_API_KEY"
Run the code. In under a second, you'll get a signed download URL for your PDF. Click it — there's your document.

Want Excel Instead?
Same template, different format:
// Node.js
const job = await rynko.documents.generateExcel({
  templateId: 'invoice',
  variables: { /* same variables */ },
});
# Python
job = client.documents.generate_excel(
    template_id="invoice",
    variables={ ... },
)
That's it. One template, both formats.
Step 5: Set Up Webhooks (Optional)
Instead of polling for completion, you can receive a webhook when your document is ready:
Go to Settings > Webhooks in the dashboard
Add your endpoint URL
Select the
document.generatedevent
When a document finishes generating, we'll POST to your endpoint with the download URL:
import { verifyWebhookSignature } from '@rynko/sdk';

app.post('/webhooks/rynko', (req, res) => {
  const event = verifyWebhookSignature({
    payload: req.body.toString(),
    signature: req.headers['x-rynko-signature'],
    secret: process.env.WEBHOOK_SECRET,
  });

  if (event.type === 'document.generated') {
    console.log('Document ready:', event.data.downloadUrl);
  }

  res.status(200).json({ received: true });
});
What's Next?
Now that you've generated your first document, here's what to explore:
Visual Designer — Design templates with drag-and-drop, live preview, and 28 component types
MCP Server — Let Claude or Cursor create and generate documents for you
API Reference — Full API documentation with interactive examples
Template Schema — Deep dive into template structure and capabilities
Integrations — Connect with Zapier, Make.com, n8n, and Google Sheets
Need Help?
Documentation — Guides, tutorials, and API reference
Discord — Chat with the team and community
support@rynko.dev — Email support
Happy generating!
Disclosure: I ideate and draft content, then refine it with the aid of artificial intelligence tools like Claude and revise it to reflect my intended message.